Measurements and Annotations
GEO4X lets you make precise measurements and add annotations directly to your geospatial data. Whether you're working in 2D or 3D, these tools are essential for analyzing, documenting and sharing your projects.
1. Available measurement types
✅ Distance measurement
- 2D mode: measures horizontal distance on the orthophoto plane.
- 3D mode: calculates actual distance, taking into account elevation variations thanks to the Digital Elevation Model (DEM).
How to measure a distance :
- Select the distance tool.

- Click on your starting point.
- Click on the end point.
- Right-click to end the trace
- The distance is displayed directly on the screen
Right-click to cancel current segment
✅ Surface measurement
- Allows you to define a closed area on your orthophotoplan or point cloud.
- GEO4X automatically calculates the area of the selected surface.
To measure a surface :
- Click on the "Surface" tool.

- Trace the contours of the area, clicking several times to place vertices.
- Right-click to finish.
- The area in m² is displayed.
✅ Calculating volumes
GEO4X offers several methods for calculating volumes from your 3D data. These tools are particularly useful for construction sites, cubature calculations or earthwork checks.
Create a volume :
- Once you've traced your surface, click on its name in the left-hand menu, and a menu will appear on the right with all the characteristics of your surface. Click on "Volume" and choose your calculation method.
- GEO4X displays the calculated volume in m³.

✅ You can also :
- Give your volume a name (e.g. "Volume tas 2").
- Choose a specific color to better visualize your volumes on the project in the left-hand menu.
2. Annotations and markers
Annotations allow you to document your project precisely. You can mark points of interest and associate information with them.
✅ Add a marker
- Click on the "Add marker" tool.

- Click on the desired location on your map or point cloud.
- Enter :
- Marker name (e.g. "Point of interest")
- Description (free text)
- Coordinates (can be modified if required)
The marker's coordinates (and those of the distances and surfaces) can be edited at any time, allowing you to fine-tune its position or place it in the void.
3. Managing measurements and annotations
Modify a measurement or marker
- Click on the item you wish to edit in the left-hand menu.
- Modify its name, description or coordinates.
Delete a measurement or marker
-
Select the item in the left-hand menu.
-
Click on the delete icon in the top menu (trash can).

Change the color of the measurements
- In the same menu, change the color via the color picker
4. Viewing measurements
- 2D or 3D display: All your measurements and annotations automatically adapt to the selected display mode.
- Data is reprojected correctly in 3D using the DEM.
5. Export your measurements
- All measurements (marker, distances, surfaces) can be exported in :
- GeoJSON
- KML
To export :
- Go to the left-hand menu and click on Import/Export .
- Choose the desired format.
- Download the file with all your measurements.
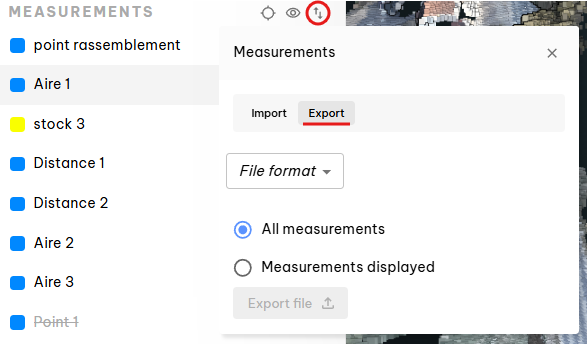
You can also export only certain measurements by selecting them from the left-hand menu.

Same procedure for importing georeferenced measurements from third-party software into GEO4X.
✅ Best practices
✔ Name your measurements and markers explicitly (e.g. "North Slope - Excavation volume") for easy identification.
✔ Use distinct colors for your volumes or surfaces, especially in complex projects.